DOS retrocoding 01 - setting up
| Author: | John Tsiombikas (Nuclear of TheLab and Mindlapse). |
|---|---|
| Contact: | nuclear@member.fsf.org |
Contents
1 Series introduction
Welcome to the first part of my series of tutorials on DOS retrocoding. In this series I will guide you through the basics of writing games or demos, on 90s era MS-DOS computers.
I will, necessarilly, have to touch onto some graphics programming fundamendals along the way, but I will not focus on high level graphics algorithms. Such concepts are mostly platform-independent, and there are many texts available on the subject (see Real-Time Rendering by Möller, Haines and Hoffman).
The focus of this series is going to be on the aspects of programming for games/demos, which modern systems handle for us. We will have to transcend the boundaries of typical modern user-level programs, into the field of what today would be called kernel programming, but was once the bread and butter of any game or demo hacker. This holistic systems programming approach which was required by 90s game development, is in a large extend the lure of such kind of retrocoding. It puts the programmer in the driver seat, requiring deep understanding of the system on all levels, and minimizing 3rd party black boxes which, today, impede total knowledge and control.
If any of the above sound enticing to you, feel free to tag along.
2 Overview of the intel PC architecture
2.1 16bit Real Mode
All x86 processors start running in 16bit mode after a reset, in order to maintain backwards compatibility with programs written for the 8086. This 16bit mode is called "real mode", and it's the mode in which MS-DOS and most DOS programs run.
In real mode the processor uses 20 bit addresses like the original 8088/8086, and can thus access up to 1MB of memory (2^20 bytes). The 20 bit addresses are formed by combining the value of a segment register with a 16bit offset. The offset is added to the value of the segment register shifted 4 bits to the left like so:
20     16     12      8      4      0
 +------+------+------+------+      .
 |15  12|11   8|7    4|3    0|      . segment
 +------+------+------+------+      .
        +------+------+------+------+
    +   |15  12|11   8|7    4|3    0| offset
        +------+------+------+------+
When talking about real-mode addresses, we often use the segment:offset notation. So for instance the linear 20bit memory address abcde can be accessed by loading a segment register with the value a000 and using it with the offset value bcde, in which case we refer to that address as a000:bcde. Note that segments can overlap, and we could also access the exact same linear address as ab00:0cde, a00d:bc0e etc.
2.2 32bit protected mode
Intel processors during our focus period of the 90s, had progressed far from their lowly 16bit ancestors used in the original IBM PC and AT. Starting from the 386 and onwards, x86 processors where fully 32bit, featuring virtual memory, priviledge levels, and memory protection.
In 32bit protected mode, memory accesses use 32bit addresses, making it possible to access up to 4GB, which might as well be infinity for how ludicrously large it was back then. Addressing in protected mode then becomes much easier, as a single 32bit value can be used as a linear address; no more of all that segment/offset nonsense.
As I mentioned previously, all x86 processors start in 16bit real mode, and it takes explicit action by the program to switch into the 32bit protected mode of operation. The process of switching to protected mode and setting up a virtual memory system is very interesting, and instructive on the inner workings of the x86 processor and the fundamendals of kernel programming. It is however somewhat complicated, and was almost always delegated to specialized middleware like DOS4G and Tran's PMODE. If you're interested in this subject, see my "Kernel Development from Scratch" series of articles: http://nuclear.mutantstargoat.com/articles/kerneldev/ (unfortunately currently only available in Greek).
3 Tooling up for DOS retrocoding
The first choice we're faced with, when it comes to setting up a development environment for DOS hacking, is wether we want to write 16bit or 32bit programs, since most compilers do one or the other, but not both. Back then I used to use the Borland C/C++ compiler almost exclusively, which is only capable of producing 16bit real mode code. A counter-example is DJGPP, which is the DOS port of the GNU compiler toolchain, which only supports 32bit code generation. Luckily there's another compiler, arguably the most popular C/C++ compiler for the platform among game and demo hackers, which can produce both 16 and 32bit code: Watcom.
The Watcom compiler was proprietary back then, but thankfully it was released under a free software license in recent years, under the name of OpenWatcom. My setup instructions are going to be about OpenWatcom, because it's easier to obtain, but also because it's always best to avoid properietary software. However, the changes between Watcom 11.0c (the last proprietary release), and OpenWatcom 1.9 are minimal, so feel free to use whichever one you want. I will make sure that all the example code in this series of tutorials can be compiled with either version.
3.1 DOSBox setup
Let's start easy and set everything up in an emulator. Setting up a dedicated DOS machine is preferable, but it will be more complicated if you don't have previous experience with MS-DOS, and it's not really necessary.
Start by downloading and installing dosbox. Package repositories of most modern UNIX systems already have dosbox, otherwise go to http://www.dosbox.com/ to download and install it manually.
Next, you're going to have to make a directory, which will be the C: drive of your emulated DOS computer. For instance, mine is at ~/dos but feel free to put it wherever you like. We will refer to that directory from now on as the dosbox root directory.
When you start dosbox, it expects to find a configuration file called dosbox.conf in the current working directory. I always change into ~/dos before I run dosbox, so that's where I placed the configuration file, but if you're using a GUI to launch dosbox, wither put it together with the dosbox executable (typical on windows), or arrange for dosbox to read your configuration file wherever it might be, by passing the -conf /path/to/dosbox.conf argument. Let's add the following few lines to the dosbox configuration file (everything else will remain at default values):
[autoexec]
@echo off
mount c: /path/to/dosbox_root_directory
c:
Everything you add to the [autoexec] section of dosbox.conf will be executed automatically when dosbox starts. In this case we simply arrange to mount our dosbox root directory as the drive C: and switch to it. We will need to add more commands here as we progress. If you opt to set up a proper DOS computer, you should instead edit autoexec.bat, for everything I instruct you to add to the [autoexec] section from this point forward.
3.2 OpenWatcom setup
It's time to download and install OpenWatcom. Go to the OpenWatcom download page: http://openwatcom.org/download.php or their ftp server: ftp.openwatcom.org/install, download the DOS installer: open-watcom-c-dos-1.9.exe, and place it somewhere in the dosbox root directory, so we can run it from inside dosbox. Make sure to rename it to something reasonable like owsetup.exe first though. Remember that MS-DOS filenames can only be a maximum of 8 characters long, plus an optional 3 character "extension".
Quick tip: If dosbox is already running when you place the openwatcom installer in its root directory, you won't be able to see the file from within dosbox, until you force a rescan by hitting ctrl-f4.
Run owsetup to install OpenWatcom.
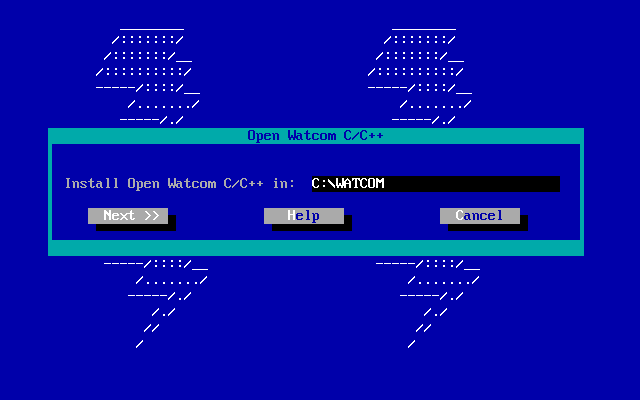
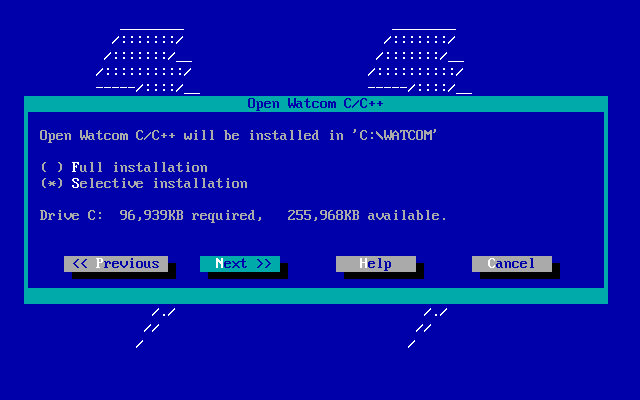
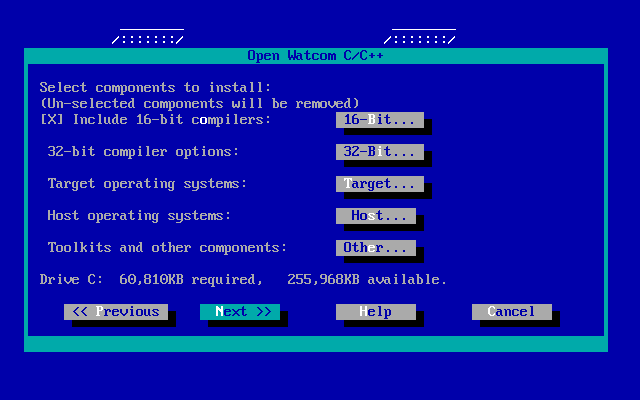
Choose selective installation, and just use the default selection. Make sure it includes 16bit and 32bit compilers, and the target/host systems are DOS.
Since the OpenWatcom installer knows nothing about our dosbox.conf, it will just try to add its paths to the autoexec.bat file.
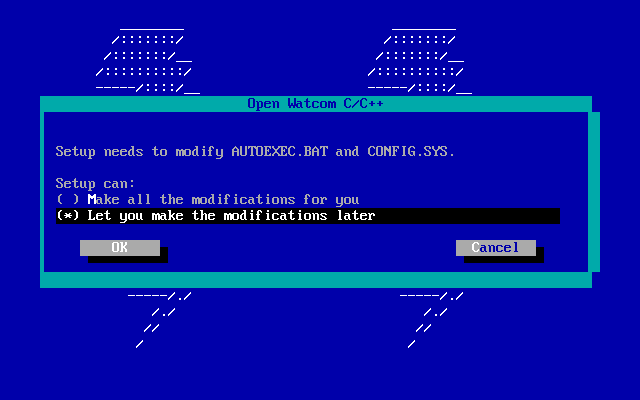
You can let it do that, then copy the contents of autoexec.bat to the end of the [autoexec] section of the dosbox configuration, or you can say no, and just add them manually:
PATH c:\watcom\binw;%PATH%
set INCLUDE=c:\watcom\h
set WATCOM=c:\watcom
set EDPATH=c:\watcom\eddat
set WIPFC=c:\watcom\wipfc
3.3 Text Editor
Watcom comes with its own implementation of vi for DOS. It's nowhere near vim in terms of functionality, but it will do just fine.
If you would rather use vim, you can certainly do that. The last available version of vim for MS-DOS is vim 7.x. Head over to the vim download page, under the "PC" section: http://www.vim.org/download.php#pc and grab the latest 32bit DOS executable, and its corresponding runtime package. As of this writing those would be: ftp://ftp.vim.org/pub/vim/pc/vim73_46d32.zip and: ftp://ftp.vim.org/pub/vim/pc/vim73rt.zip. Unzip them both, and move the vim directory to your dosbox root. Then add the vim directory to the executable path in your [autoexec] section:
PATH c:\vim\vim73;%PATH%
The 32bit version of vim for DOS is compiled with DJGPP, and as such, it needs a DPMI server to function. Download: http://www.delorie.com/pub/djgpp/current/v2misc/csdpmi7b.zip, extract it, and copy the file CWSDPMI.EXE to the vim executable directory, in c:\vim\vim73.
If you would rather use something other than vi for editing code, you're on your own. Good luck.
4 Hello World program
Let's write a hello world program to familiarize ourselves with our tools. To keep it from being completely trivial in terms of build process, we'll break it into two source files: main.c, and hello.c. Create a directory named hello (the DOS command for that is md hello), and create the these two source files in there:
/* main.c */
void hello(void);

int main(void)
{
    hello();
    return 0;
}
/* hello.c */
#include <stdio.h>

void hello(void)
{
    printf("hello world!\n");
}
Let's compile them manually first, to observe Watcom build process more vividly. First we'll call the watcom 16bit C compiler to compile our source files into object code, then use the linker to combine the object files into an executable:
C:\HELLO>wcc main.c
C:\HELLO>wcc hello.c
C:\HELLO>wlink name hello.exe file { main.obj hello.obj }
The first two steps produce intermediate object files main.obj and hello.obj respectively, which are then fed to the linker to produce the final executable: hello.exe:
C:\HELLO>hello
hello world!
If you try these commands yourself, you will notice that wcc prints a lot of messages while compiling our source code, which tends to become annoying very fast. From now on we'll pass the -zq flag to the compiler to instruct it to shut up.
4.1 Watcom Make
It goes without saying that no toolchain is complete without a make tool, and watcom is no exception. The watcom make variant is very similar to standard UNIX implementations of make, which makes it easy to pick up, if you're used to writing makefiles. If you're not familliar with makefiles, you might want to take a look at my "Practical Makefiles, by Example" article: http://nuclear.mutantstargoat.com/articles/make/. That tutorial describes GNU make, and while most of the fundamendals apply, watcom make lacks a lot of the more advanced GNU features.
In any case, here's a simple Makefile for our hello world program:
obj = main.obj hello.obj
bin = hello.exe

CC = wcc
CFLAGS = -zq
LD = wlink

$(bin): $(obj)
    $(LD) name $@ file { $(obj) }

.c.obj:
    $(CC) -fo=$@ $(CFLAGS) $<

clean: .symbolic
    del *.obj
    del $(bin)
As always with make, make sure commands for each rule are indented by a single tab character, not 4 spaces.
Running wmake will read the Makefile, build any out of date targets and create our executable:
C:\HELLO>wmake
wcc -fo=main.obj -zq main.c
wcc -fo=hello.obj -zq hello.c
wlink name hello.exe file { main.obj hello.obj }
C:\HELLO>hello
hello world!