 the dot product is
defined as Ax * Bx + Ay * By + Az * Bz.

Welcome to the first lesson of this series of tutorials on 3D computer graphics coding. Without wasting any time, let's jump into the exciting topic of 3D graphics. But before going into the details, it is better to make a small introduction on how the whole system works in a few words, to provide an overview that will keep you from losing the whole picture while working out the details.
What we want to achieve is a system that will allow us to define all kinds of objects in 3-dimensional space and visualize them in a realistic way to create the illusion of a 3D world. In a nutshell, we represent each object by points that lie on its surface. These points are called vertices and by manipulating these points with simple mathematical transformations we move the object around in space. After we finish with the manipulation of the geometric properties of the object, we use these vertices to visualize it. We calculate the amount of light that each point of the object receives by nearby light sources, and finally visualize the object by drawing the polygons between vertices that make its surface. Now that we have a general idea of what we are going to do, let's dive into the first details.
As I mentioned in the short overview above, we want to represent each object by the points that lie on its surface. Our 3D space can be considered as a Cartesian coordinate system, thus enabling us to describe each vertex using a coordinate triplet (a 3-dimensional vector). So before we go on we must create a class that will represent 3D vectors and define operations on them. for ease of notation I will make heavy use of operator overloading whenever possible. Let's see our first class.
class Vector {
public:
    float x, y, z;

    Vector();                          // default constructor
    Vector(float x, float y, float z); // initializer constructor

    /////// mathematical operations on vectors ///////
    float DotProduct(const Vector &vec) const;
    Vector CrossProduct(const Vector &vec) const;

    Vector operator +(const Vector &vec) const;
    Vector operator -(const Vector &vec) const;
    Vector operator -() const;
    Vector operator *(float scalar) const;

    void operator +=(const Vector &vec);
    void operator -=(const Vector &vec);
    void operator *=(float scalar);

    ////// other useful operations on vectors //////
    float Length() const;   // length of vector
    void Normalize();       // vector normalization

    void Transform(const Matrix4x4 &mat);
};
The above vector class is a minimal representation of vectors containing everything that we will need throughout these tutorials. Basically it's three floating point numbers for the coordinates, a set of constructors to initialize the vector, the mathematical operations on vectors implemented with operator overloading, and some useful functions that calculate the length of the vector (Pythagorean theorem: len = sqrt(x*x + y*y + z*z)), normalize a vector (normalization: making the length of a vector equal to one (unit vector) while maintaining its orientation), and transform a vector with a specified transformation matrix. The code is pretty straightforward, let's take a look at each member function in turn. I'll skip the constructors, since it's pretty obvious what they should do.
Dot Product: The dot product of two vectors returns a scalar
value that is the length of the first times the length of the second times the
cosine of their angle, i.e.  the dot product is
defined as Ax * Bx + Ay * By + Az * Bz. the dot product is
defined as Ax * Bx + Ay * By + Az * Bz.
|

|
float Vector::DotProduct(const Vector &vec) const {
    return x * vec.x + y * vec.y + z * vec.z;
}
|
Cross Product: The cross product of two vectors gives us a third
vector that is perpendicular to the plane defined by the two. The cross product
is defined as follows: Cross_x = Ay*Bz - Az*By Cross_y = Az*Bx - Ax*Bz Cross_z = Ax*By - Ay*Bx |

|
Vector Vector::CrossProduct(const Vector &vec) const {
    return Vector(y * vec.z - z * vec.y,  z * vec.x - x * vec.z,  x * vec.y - y * vec.x );
}
Addition, Subtraction: The addition and subtraction of vectors is simply point wise addition/subtraction of their components.
Vector Vector::operator +(const Vector &vec) const {
    return Vector(x + vec.x, y + vec.y, z + vec.z);
}

Vector Vector::operator -(const Vector &vec) const {
    return Vector(x - vec.x, y - vec.y, z - vec.z);
}

void Vector::operator +=(const Vector &vec) {
    x += vec.x;
    y += vec.y;
    z += vec.z;
}

void Vector::operator -=(const Vector &vec) {
    x -= vec.x;
    y -= vec.y;
    z -= vec.z;
}
Inversion: Inverting the sign of a vector is simply inverting the signs of each component of that vector. Here this operation is defined by the prefix - operator
Vector Vector::operator -() const {
    return Vector(-x, -y, -z);
}
Multiplication with scalar: By multiplying a vector by a scalar value, we effectively scale it, lengthening/shortening it while maintaining its orientation.
Vector Vector::operator *(float scalar) const {
    return Vector(x * scalar, y * scalar, z * scalar);
}

void Vector::operator *=(float scalar) {
    x *= scalar;
    y *= scalar;
    z *= scalar;
}
| Length of vector: The length of a vector can be calculated with the Pythagorean theorem as sqrt(x*x + y*y + z*z). You can see the familiar 2D version of the same thing in the diagram to the right. |

|
float Vector::Length() const {
    return (float)sqrt(x*x + y*y + z*z);
}
Normalization: By normalizing a vector we are making it a unit vector with the same orientation as the original, the characteristic of a unit vector is that its length equals 1. We do that by finding its current length and dividing each component of the vector by it.
void Vector::Normalize() {
    float len = (float)sqrt(x*x + y*y + z*z);
    x /= len;
    y /= len;
    z /= len;
}
Transform with transformation matrix: Our matrix class that we are going to see in a little while is mainly a 4 by 4 two-dimensional array. We transform a vector by treating it as a column vector (4x1 matrix, including a virtual w coordinate that is always 1) and multiplying that with the transformation matrix.

void Vector::Transform(const Matrix4x4 &mat) {
    float newx = mat.m[0][0] * x + mat.m[0][1] * y + mat.m[0][2] * z + mat.m[0][3];
    float newy = mat.m[1][0] * x + mat.m[1][1] * y + mat.m[1][2] * z + mat.m[1][3];
    z = mat.m[2][0] * x + mat.m[2][1] * y + mat.m[2][2] * z + mat.m[2][3];
    x = newx;
    y = newy;
}
Now it's a good time to make our transformation matrices. Why 4 by 4 you might think? The truth is that we can represent linear transformations in 3 dimensional space with a 3 by 3 matrix, but then we will be able to make a compound rotation and scaling 3 by 3 matrix and we would need to add a translation vector to the transformed vector, because we can't also represent translation in a 3 by 3 matrix. So because we want to be able to have a single transformation matrix for all the transformations (rotation, translation, scaling) we increase the dimensionality of space, incorporating a virtual w coordinate that is always 1 and use 4 by 4 matrices. The top-left 3 by 3 part of the matrix is the rotation and scaling, and then we include translation as the last column of the matrix. Here is our matrix class.
class Matrix4x4 {
public:
    float m[4][4];

    // constructors
    Matrix4x4();
    Matrix4x4(	float m00, float m01, float m02, float m03,
                float m10, float m11, float m12, float m13,
                float m20, float m21, float m22, float m23,
                float m30, float m31, float m32, float m33 );

    void ResetIdentity();  // sets identity matrix

    // mathematical operations on matrices
    Matrix4x4 operator +(const Matrix4x4 &mat) const;
    Matrix4x4 operator -(const Matrix4x4 &mat) const;
    Matrix4x4 operator *(const Matrix4x4 &mat) const;
    Matrix4x4 operator *(float scalar) const;

    void operator +=(const Matrix4x4 &mat);
    void operator -=(const Matrix4x4 &mat);
    void operator *=(const Matrix4x4 &mat);
    void operator *=(float scalar);

    // functions that concatenate a specific transformation into our matrix
    void Translate(float x, float y, float z);
    void Rotate(float x, float y, float z);
    void Scale(float x, float y, float z);
};
Let's consider each function in turn, again I'll skip the constructors, keep in mind that I find it useful for the default constructor to initialize the matrix to an identity matrix (that is, all zeroed out except for the main diagonal that is 1).
| Identity Matrix: the ResetIdentity() member function will be used to set a matrix to identity, an identity matrix is as shown in the diagram and has the property of being the neutral element of matrix multiplication. That is, every matrix multiplied by identity remains the same (AI = A) the implementation goes as follows. |

|
void Matrix4x4::ResetIdentity() {
    memset(m, 0, 16*sizeof(float));
    m[0][0] = m[1][1] = m[2][2] = m[3][3] = 1.0f;
}
Addition, subtraction, scalar multiplication: The matrix operations for addition, subtraction as well as multiplication with a scalar are simply point-wise operations, you just perform the operation for each element.
Matrix4x4 Matrix4x4::operator +(const Matrix4x4 &mat) const {
    Matrix4x4 temp;
    const float *op1 = (const float*)mat.m;
    const float *op2 = (const float*)m;
    float *dest = (float*)temp.m;

    for(int i=0; i<16; i++) {
        *dest++ = *op1++ + *op2++;
    }
    return temp;
}

Matrix4x4 Matrix4x4::operator -(const Matrix4x4 &mat) const {
    Matrix4x4 temp;
    const float *op1 = (const float*)mat.m;
    const float *op2 = (const float*)m;
    float *dest = (float*)temp.m;

    for(int i=0; i<16; i++) {
        *dest++ = *op1++ - *op2++;
    }
    return temp;
}

Matrix4x4 Matrix4x4::operator *(float scalar) const {
    Matrix4x4 temp;
    const float *elem = (const float*)m;
    float *dest = (float*)temp.m;

    for(int i=0; i<16; i++) {
        *dest++ = *elem++ * scalar;
    }
    return temp;
}

void Matrix4x4::operator +=(const Matrix4x4 &mat) {

    const float *op = (const float*)mat.m;
    float *dest = (float*)m;

    for(int i=0; i<16; i++) {
        *dest++ += *op++;
    }
}

void Matrix4x4::operator -=(const Matrix4x4 &mat) {

    const float *op = (const float*)mat.m;
    float *dest = (float*)m;

    for(int i=0; i<16; i++) {
        *dest++ -= *op++;
    }
}

void Matrix4x4::operator *=(float scalar) {

    float *elem = (float*)m;
    for(int i=0; i<16; i++) {
         *elem++ *= scalar;
    }
}
4x4 by 4x4 matrix multiplication: This is an essential part of the matrix class. In 3D transformations, we tend to concatenate multiple transformation matrices in one compound matrix that does all the job and then transform our vertices using this compound matrix. This concatenation is done by multiplying the transformation matrices together. A very important note that you should keep in mind is that matrix multiplication is not commutative thus AB is not equal to BA. Matrix multiplication, although it looks complex at first sight, it is just a dot product of each of the "Vectors" contained in each matrix. We see the first matrix as a series of four four-valued row vectors, and the second matrix as a series of four four-valued column vectors and take their dot product in turn and placing it at their common element of the destination matrix.
Matrix4x4 Matrix4x4::operator *(const Matrix4x4 &mat) const {
    Matrix4x4 temp;

    for(int i=0; i<4; i++) {
        for(int j=0; j<4; j++) {
            temp.m[i][j] = m[i][0]*mat.m[0][j] + m[i][1]*mat.m[1][j] +
                           m[i][2]*mat.m[2][j] + m[i][3]*mat.m[3][j];
        }
    }

    return temp;
}

void Matrix4x4::operator *=(const Matrix4x4 &mat) {

    Matrix4x4 temp;

    for(int i=0; i<4; i++) {
        for(int j=0; j<4; j++) {
            temp.m[i][j] = m[i][0]*mat.m[0][j] + m[i][1]*mat.m[1][j] +
                           m[i][2]*mat.m[2][j] + m[i][3]*mat.m[3][j];
        }
    }

    *this = temp;
}
And now that we've taken the math operators that we need out of the way, let's see the functions that will create our transformation matrices. Starting from the simplest one, that is translation.
Translation: by translation we mean displacing the object in
3-dimensional space. The mathematical formula for translation is simply:
x' = x + tx
y' = y + ty
z' = z + tz
where x' y' z' are the new translated coordinates, x y z are the original coordinates, and
tx ty tz are the elements of the vector that describes the translation for each axis. The
matrix form of the translation is the following

And here is the code that concatenates a translation in our matrix.
void Matrix4x4::Translation(float x, float y, float z) {

    Matrix4x4 temp( 1, 0, 0, x,
                    0, 1, 0, y,
                    0, 0, 1, z,
                    0, 0, 0, 1 );
    *this *= temp;
}
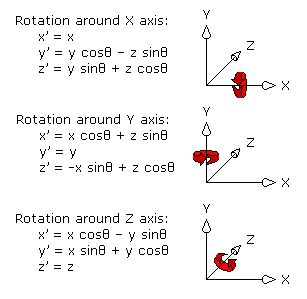
Rotation: the word rotation is self-explanatory. We want to rotate a point around the origin of the coordinate system, and the formulae that do that for us are the following.

And in matrix form we have the following rotation matrices.
 |
 |
 |
| Rotation around X | Rotation around Y | Rotation around Z |
Thus we create a function that will take x y and z rotation and make us a matrix with those 3 transformations concatenated with that order. Note that if we want different order we can just call the function 3 times one for each rotation and pass the angle we want to the rotation of interest while leaving the other two zero, thus essentially creating a matrix for that rotation only each time.
void Matrix4x4::Rotation(float x, float y, float z) {
    Matrix4x4 rx, ry, rz;

    rx = Matrix4x4( 1,  0,              0,              0,
                    0,  (float)cos(x),  -(float)sin(x), 0,
                    0,  (float)sin(x),  (float)cos(x),  0,
                    0,  0,              0,              1 );

    ry = Matrix4x4( (float)cos(y),  0,  (float)sin(y),  0,
                    0,              1,  0,              0,
                    -(float)sin(y), 0,  (float)cos(y),  0,
                    0,              0,  0,              1 );

    rz = Matrix4x4( (float)cos(z),  -(float)sin(z), 0,  0,
                    (float)sin(z),  (float)cos(z),  0,  0,
                    0,              0,              1,  0,
                    0,              0,              0,  1 );

    *this *= rx;
    *this *= ry;
    *this *= rz;
}
Scaling: Scaling is performed simply by multiplying the vector
with a scalar value (for uniform scaling), or multiplying each component of the
vector by a different scalar value (for non-uniform scaling).
x' = x sx
y' = y sy
z' = z sz
The corresponding transformation matrix is the following.

And here is the code that concatenates a scaling transformation to our current matrix
void Matrix4x4::Scaling(float x, float y, float z) {

    Matrix4x4 temp( x, 0, 0, 0,
                    0, y, 0, 0,
                    0, 0, z, 0,
                    0, 0, 0, 1 );

    *this *= temp;
}
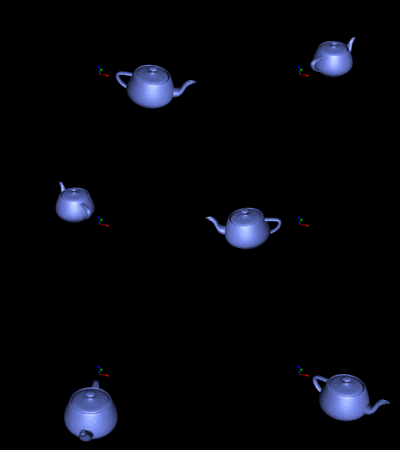
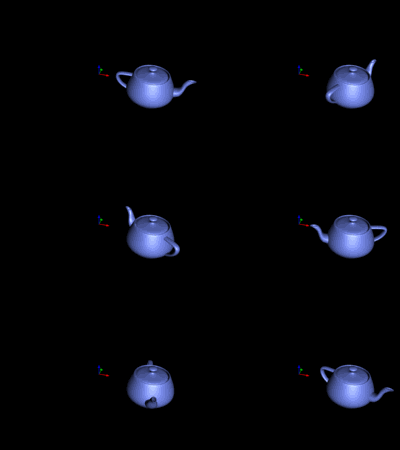
Note that the order in which you apply the transformations matters. In order to see that clearly check the diagram below, that shows a 3D object transformed by two different matrices, one that contains rotation and then translation, and another that contains translation and then rotation. Note also that if we multiply the matrices in reverse order, we get reversed results as to the net effect of the transformation, and in fact it is more of a matter of convention which way we do it.
 |
 |
| Rotation followed by Translation | Translation followed by Rotation |
And that is all about our matrix class. One final thing that I want to cover in this first tutorial is coordinate systems.
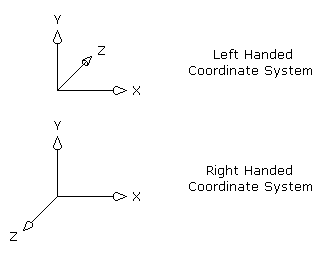
There are two different conventions when it comes to coordinate systems. These are referred to as "left handed" or "right handed" coordinate systems. The difference between the two, is practically the direction of the positive Z axis. In a left handed coordinate system the positive Z points away from the viewer, while in a right handed coordinate system, the positive Z points towards the viewer, see the diagram below for a graphic representation of the two different coordinate system conventions. Note that throughout these tutorials, I'll use a left handed coordinate system, as I find it more intuitive thinking that I look towards the positive axis and negative is behind me.

Right about here I'll conclude the first lesson on 3D computer graphics coding. As you can understand there are a lot more to learn before you draw your first full blown 3D scene, indeed we did not even put a single polygon to screen yet. However, don't get disappointed as the good stuff is coming. Check back for the next lesson which will cover the basic data structures which we'll need, the rendering pipeline and we'll draw our first simple wireframe object on screen.